Step 1: Sand the top of the domino, until it's not shiney anymore, allowing your ink to actually stay on the domino. :P
Step 2: Select the colour you want to use, then ink the domino. You can really use any pigment ink, but Brilliance is my favourite...as you can tell... :P
Step 3: You must then dry the ink, using either a craft heat gun, or a blow dryer. (a blow dryer will take longer) Dry until it's...dry. :P Try lightly putting your finger on top, and then see if it comes away with ink on it. BE CAREFUL. Dominos can get extremely hot when heated. I have burned my finger tips several times. Besides your own saftey, you should also let your domino cool a bit before the next step.
Step 4 (optional): A lot of times when I make dominos, I want more than one colour. So, now would be the time to pick. :P YOU SHOULD ALWAYS dry the ink between colour layers, or you'll end up with the wrong colour ink on the other ink pads.
Step 5: Dry the new colours on the dominoes. No picture. You know what it looks like. :P
Step 6: Pick out the stamp you want to put on the domino.
Step 7: Ink your stamp. I use Stazon, but you can use any as long as it's perminant. It has to say that, otherwise, it will fail. :P
Step 8: Stamp the domino. I find it easier, to put the domino on the stamp, rather than the other way around, but it's up to you. Just press hard, then relax, then lift it up. Don't just press hard, and pull it off, not sure why, but this doesn't work as well, just relax the pressure first.
Here is a picture of a finished domino. No it's not the one I just used in the stamping example...I kinda screwed that one up. :P Which, if that happens, just sand it off, and you can use the domino again. It's the pink one from the example, rather than the red.
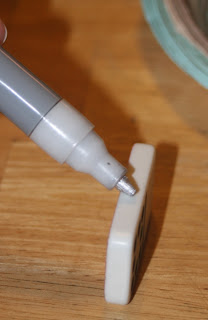
Step 9: Paint the edges with a paint pen. I would recommend a calligraphy tip, rather than rounded.
You can actually hold the domino while doing this, but I couldn't do that, AND take the picture. :P
Step 10: Spray it with sealer so it doesn't get scratched. I use Krylon. :)
Step 11 (optional): I always glue a little crystal on mine, just so they sparkle. 'Cause I like sparkly things. :P
I don't know if you can see it in the right hand corner, on the swirl, but it's there. :P
One other thing...just because a stamp is bigger than a domino, doesn't mean it won't work. I actually prefer it if the design doesn't all fit. Just pick the part you like best, and stamp it. :) I use some 6"X6" stamps, so it's all good. :D
Here are just some out of literally hundreds that I've done. :)
Hope you enjoyed this!!!
~ Calleigh


YAYZ!!!!!!!!!!!!!!! *tackles tutorial* Fantabulous job Squirt! Thanks so much for taking all that time to share with us! :D
ReplyDelete*laughs* Glad you enjoyed it, Sis!! :D
ReplyDeleteMUST. NEEDS. TRY. THIS. O.O
ReplyDelete